
You’re ready to get started with Facebook ads – awesome. You know you can get your work in front of a specific audience, clue them into your offerings, grow your list, and even make sales.
What you can’t do is understand which ads worked best if you didn’t have the Facebook Pixel in place from the get-go!
“What the heck is this Facebook Pixel anyway??”
Fortunately it’s not nearly as complicated as it sounds. Basically you install some lines of code in the backend of your website JUST ONE TIME, which allows you to do two important things:
- Target people who have visited your website in the past with your ads (also called retargeting or remarketing), and
- Track any conversions that come in as a result of your ads.
First you need to define what the “conversions” in your business are. Most online entrepreneurs consider any kind of transaction a conversion. In other words, when someone buys something from you, they convert from a prospect to a customer or client.
But you could have other important conversions as well, for example:
- When I subscribe to your newsletter.
- When I see a product I like on your ecommerce store and add it to my cart.
- When I sign up for your free or reduced-price trial membership.
- When I click from your blog posts over to the sales page of your product or service.
With Facebook ads, it’s REALLY easy to see not only which ads/audiences are getting you the most conversions, but how much each you’re paying for each one.
So it’s time to install this pixel and then set up conversion tracking!
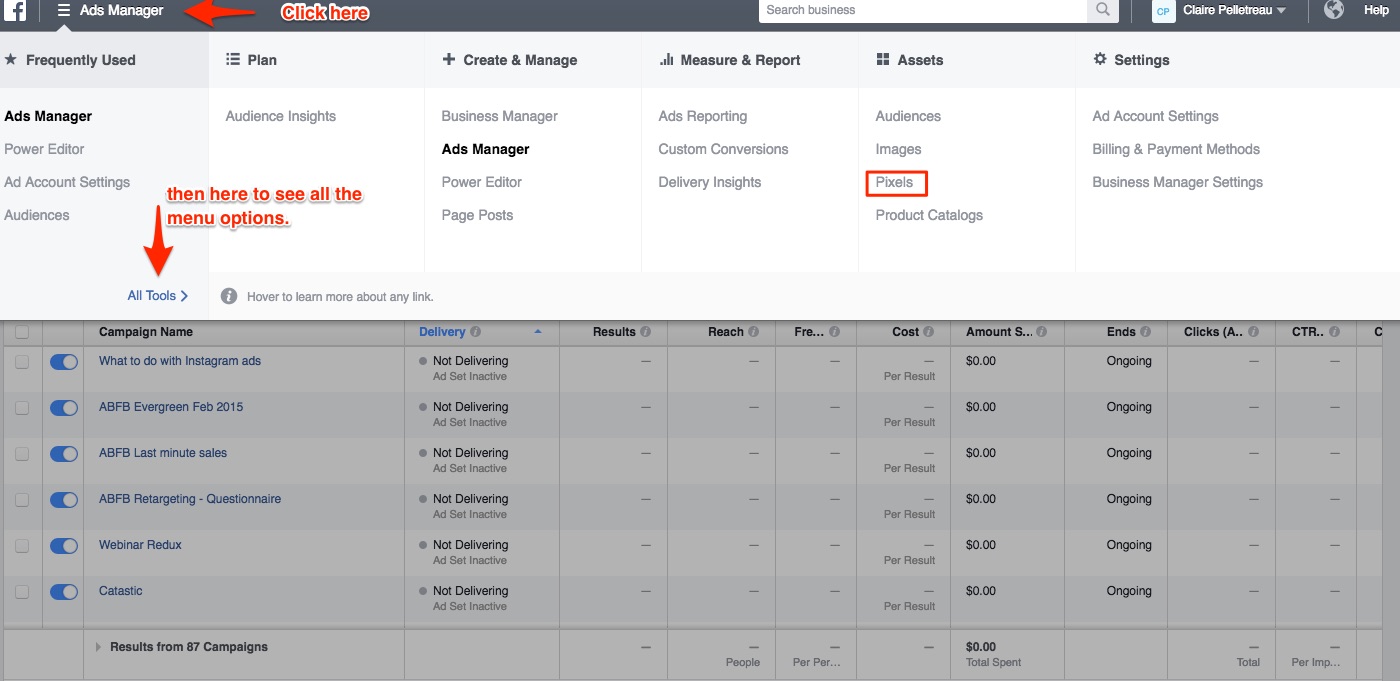
You’ll start in the Ads Manager, which you reach by visiting facebook.com/ads/manage. (This is assuming that you already have a Facebook advertising account connected to your regular profile. If you’ve ever boosted a post or run an ad, you have this account.)
Click on the little menu icon at the top left of your screen, and then scroll over All Tools. You’ll see a bigger menu pop out to the right. Click on Pixels under Assets.
Click on the green button that says Create a Pixel. Give it a name like “[Your Company Name] Facebook Pixel.” Then click the Create Pixel button.
![]()
NOTE: if you don’t see the green Create a Pixel button, it means you’ve already created your Facebook Pixel. But to be certain you’ve installed it in the correct place, click on the button that says Actions and then on View Pixel code. Continue to follow the rest of these directions.
You’ll see a box with several lines of code in it; go ahead and copy/paste the code into a doc on your computer so you can access it later.
![]()
Now you need to place it in the backend of each of your Leadpages pages.
Click for instructions on how to install the Facebook Pixel on Wordpress sites or here to place it on Squarespace sites.
How to Install the Facebook Pixel on Leadpages Pages
1. When editing your Drag and Drop template, click on the SEO & Analytics icon. (If you’re using the original/standard page builder, click here for instructions.)
![]()
2. Click on Analytics and the paste the Facebook Pixel code in the box that says Head Section Tracking Code.
![]()
Hit Save.
3. Repeat on every other Leadpages page that’s currently live.
And that’s it! You do NOT need to install any event codes, unless you have hundreds of products for sale on your site.
To test that you installed the pixel correctly, install the Chrome Pixel Helper extension (it’s free!) and then visit your site.
![]()
(From here on out, you’ll be able to see if the Facebook pixel is installed on any site. I don’t know about you but it makes me feel like MacGyver!)
How to Set Up Custom Conversions to Track Your Results
Now that you’ve installed the pixel, you can get real data about whether people are taking actions as a result of your Facebook ads. The new way (as of late 2015) is with custom conversions.
Fortunately custom conversions are super easy to set up:
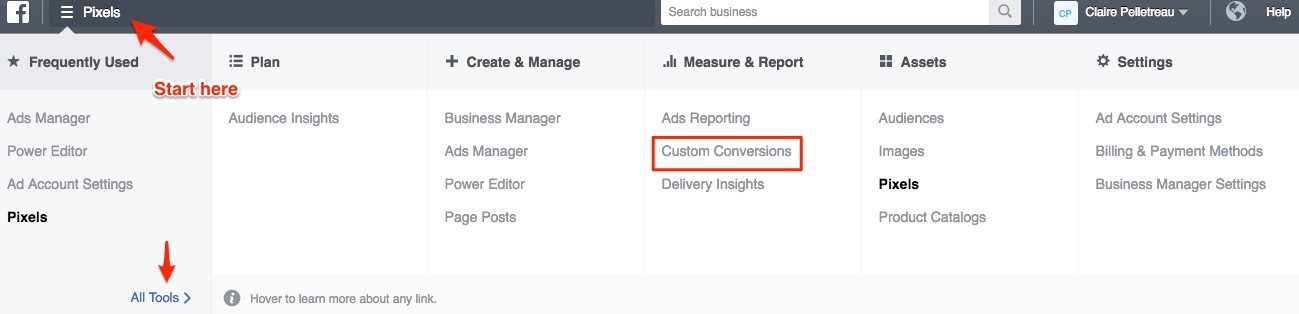
1. Go back to the Ads Manager and click on the menu at the top left. Hover over All Tools and then select Custom Conversions.
2. Click on the blue Create Custom Conversion button.
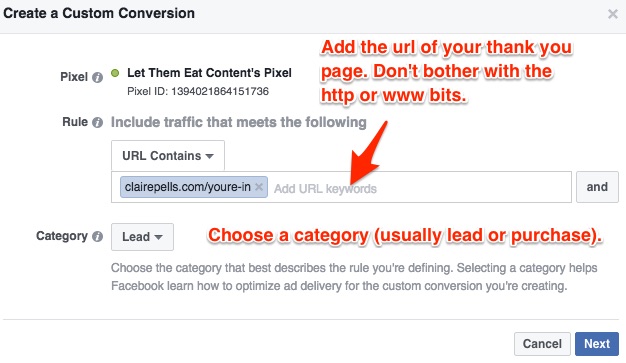
3. Insert the url of the page on your site that “marks the conversion.” Usually that means a “thank you” page that people see after signing up for your free content or buying your product. Then click Next.
4. Name your conversion something that’ll make sense to you a year from now. Don’t call it Webinar Sign Up – chances are you’ll host more than one webinar in the span of your business, right? Make it specific, like End of Boost Post Button Webinar Sign Up. (That’s the name of a webinar I ran a few times in 2015.)
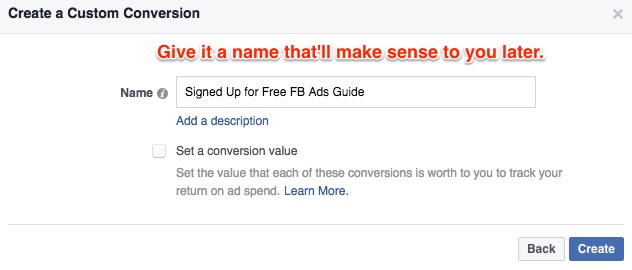
Skip the conversion value (unless you’re tracking purchases, in which case you should put the price of your product).
5. Click the Create button, and relax because you are DONE! You don’t have to install any other pieces of code; the Facebook Pixel covers everything.
How to Connect Your Custom Conversion to Your Facebook Ads
This is one thing I love about the new way to track conversions for your Facebook ads: it’s automatic! You don’t need to “connect” them like you did in the past.
Any and all custom conversions you’ve created will be tracked on every campaign you run so long as you leave this radio button selected when creating your ads:![]()
You don’t even need to worry about that, though. It’s the default when creating your ads, regardless of the type of ad.
So that’s it! Let’s recap real quick:
- Create your Facebook Pixel in the Ads Manager one time only.
- Install it on every Leadpage you’ve ever created.
- Create custom conversions whenever you have a new thing that people can sign up for (like a cheatsheet, webinar, interest list, etc.) or product.
Why You MIGHT Want to Get Creative With Your Custom Conversions
Note: you do NOT need to do any of the following, but if you’re reeeeeeally into tracking stuff or you’re serving a client who likes lots of information about their campaigns, read on!
You can also create custom conversions for some more nuanced actions people take while visiting your website. One example is visiting an important page, like a sales page for your product or service. If you have an ecommerce store, another good conversion is adding a product to their cart.
So if you want to go deeper with your tracking, create a custom conversion with the category “View Content.”
Then you could run ads to a blog post of yours that ends with a pitch for your product. When looking at your reports, you could see:
- How many people clicked over to the blog post;
- How many of THOSE people clicked from the blog post to your sales page;
- How many people ended up buying your product as a result of your Facebook ads.
Adding more custom conversions allows you to see the different steps of your funnel, and to find out how many people are making it from one step to the next.
NOTE: remember that Facebook only lets you create 20 custom conversions per account. So once you’ve used up those 20 slots, you’ll have to go back and delete some in order to create more.


Thanks so much, this should be a great help to me
Hey Colm, you’re so welcome!
Does it have to be a drag and drop lead page? Most of mine are not but I’d still love to use pixels, if that’s possible. Thanks! Bridgett
Hey Bridgett, check out this post for instructions for setting up the pixel with Leadpages if you’re not using the drag and drop interface: https://clairepells.com/set-up-facebook-ad-conversion-tracking-wordpress-leadpages/
this is so helpful! if i want to do custom conversions on leadpages do i just select “track custom conversions “or do i need to use the other option “track conversions with standard events” and change that bit of code if i am publishing on leadpages. hope that question makes sense. i keep getting tripped up on where i would ever select track with standard events option…thanks claire!
Don’t worry about standard events at all! Go with custom conversions for everything until further notice. :)
relief!! that makes it so simple. thanks again, claire!!
My pleasure!
I loved your article. Very easy to follow and understand. I created two custom conversions, one for an opt in thank you and one for a purchase thank you page. Where should I see these active? Is the new Facebook pixel going to change all of this?
Hey Jake, thanks so much for the compliments!
You’ll see those custom conversions active on the same page where you created them; look at the little line graph to the right of each one. All you need to do is visit the page once and shortly after you’ll see an uptick in the graph.
There shouldn’t be any new changes for a while, this IS the new Pixel! But you know Facebook, they’re always tweaking things.
thankyou SO MUCH for this! You made everything so clear. But I’m still confused about if I need to use URL PARAMETERS. For example, if I have 5 different ads tracking the same set of pages, will that be okay or do I need to use URL parameters?
You only need to add url parameters if you want to track conversions from FB ads in google analytics. Otherwise FB will tell you which specific ads are getting the conversions and which aren’t!
This is super helpful!! For the last part of your post, how do you track different steps of the funnel that people take? I thought each facebook ad would only allow one custom conversion tracking. Let’s say the facebook ad takes you to an email opt-in for a free pdf. After putting in your email you will go to a thank you page with a call to action for joining a waitlist for a specific product. I want to be able to track each step, but I am not sure how that’s done within the facebook ad interface. I always thought you can only track one custom conversion in each facebook ad. Thanks Claire!!
Hi Joann, you can only optimise for one conversion per ad set BUT if you customise your columns in the Ads Manager interface and add in the custom conversions you want to track you can see the stats for those in relation to those specific ads or ad sets.
Thank you, Claire! However, when I copied and pasted the code in my leadpages form as you outlined, the Facebook pixel is not showing up, according to the Chrome plugin (as opposed to my website, the pixel is not active on my leadpages page (or the thank you page after I do a test with submitting email info). Can you help me out?
Steven, did you ever resolve your issue. I am running into the same problem.
I had the same problem. The solution is: after pasting the code into the Leadpages analytics form you need to click “Save” and then to click on the “Update” button in the upper right corner of your Leadpages interface. Then refresh your page and check again. Hope it helps!
Thanks – I had eventually worked it out.
Great article Claire, thanks so much for explaining that! How would you go about setting up a custom conversion though if you are using LeadPages for your Thank-you page?
I’m wondering if the URL you add when setting up your Custom Conversion needs to be your own website or could it be the LeadPages Thank-you page URL?
Hi Alan – see my reply to Karen below, sorry we missed this one for you!
Great help! This article was still helpful in 2017. Thanks, Claire!
Thank you so much for this explication!!
Thanks for the great info! You guys made it super simple!
Question… When setting up the custom conversion, do you use the actual Leadpages URL or the URL the Leadpage maps to on your wordpress site?
Hi Karen, it should be the URL from your site if you’ve used the LeadPages plugin to put it on your own site’s domain :)
Just make sure that you’ve set your opt-in page to direct to that url too (the one on your domain) – if you’ve told Leadpages to direct to the LeadPage then you’ll need to set up the custom conversion with the LeadPages url (and also there will have been no point giving the thank you page it’s own url on your domain!)
Hmm. I thought so too, but my conversions aren’t clicking even though I am getting opt ins. I put a ticket in to Leadpages, too, to see what they have to say. I’ll let you know!
Ok cool, yea I’d definitely double-check on your opt-in page which thank you page you’ve chosen to direct to, that’s probably the main thing that could be mucked up. The other thing you can check (and this is normally only an issue if you’re using a program like ClickFunnels) but when you go to the url you’ve set your custom conversion to, is it loading and then kind of reloading to the same page but on a slightly different url – like maybe it’s adding a -2 or something at the end – that will definitely muck up your custom conversion tracking so worth checking that too
Great! This is exactly what I was looking for. Thanks Claire