
You know that Facebook Ads can be a great tool in your business arsenal. You can get your work seen by the right people, let them know about your offerings, grow your list, and even make sales.
What you can’t do is figure out which ads work best for your business if you don’t have the Facebook Pixel in place from the get-go!
“What exactly is this Facebook Pixel you speak of, Claire?”
It’s so much more simple than it sounds. Basically you put a bit of code in the backend of your website JUST ONE TIME, and it helps you do two really cool things:
- Show ads to people who have visited your website in the past (also known as retargeting), and
- Track conversions with your Facebook ads.
If you learn best via video, check out this super short video I made about how people usually MESS UP Facebook conversion tracking, and then what happens to your money if that mistake is made:
First let’s think about what the “conversions” in your business are. For most online businesses, conversions are usually when a prospect converts to a customer. In other words, when someone buys something from you.
But you have a lot of other important conversions as well, such as:
- I sign up for your newsletter.
- Instead of just browsing your online store, I actually add something to my cart.
- I opt in to your free or reduced-price trial membership.
- After reading your blog post, I click over to check out the sales page of your product or service.
You get to set the conversions in your business, and usually you add them as “goals” in your Google Analytics account.
For your Facebook ads, however, it’s REALLY easy to see not only which ads are netting you the most conversions, but how much each one of those conversions is costing you.
So it’s time to install this pixel and then set up conversion tracking – you with me?
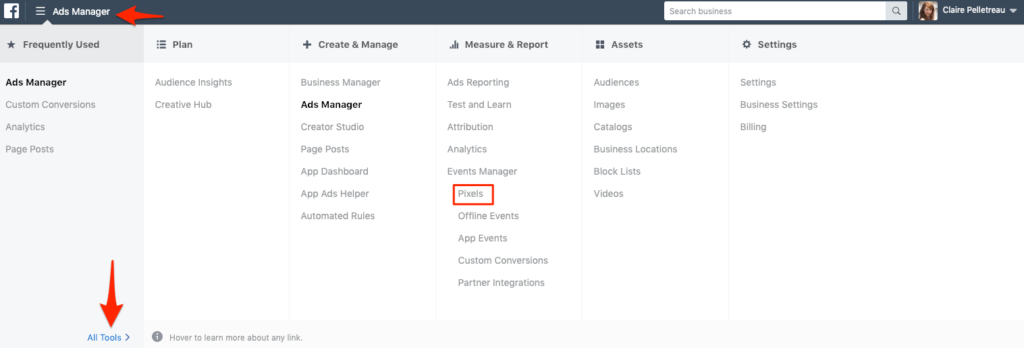
Start in the Ads Manager by visiting facebook.com/ads/manager. (This is assuming that you already have a Facebook advertising account connected to your regular profile. If you’ve ever boosted a post or run an ad, you have this account.)
Click on the little hamburger menu icon at the top left of your screen, and then scroll over All Tools. A larger menu will pop out to the right. Click on Pixels under Measure & Report.
Click on the green button that says Create a Pixel. Give it a name like “[Your Company Name] Facebook Pixel.” Then click the Create Pixel button.
NOTE: if you don’t see the green Create a Pixel button, it means you’ve already created your Facebook Pixel. But to be certain you’ve installed it in the correct place, click on the button that says Actions and then on View Pixel code. Continue to follow the rest of these directions.
Scroll down to step 2; you’ll see a box with several lines of code in it; go ahead and copy/paste the code into a doc on your computer so you can access it later.
Can’t find that code? Check out this 25-second Ads Manager tour:
Now you need to place it in the backend of your website. Below are instructions for Wordpress sites.
If your site is on Squarespace, click here for instructions.
Important: if you use Leadpages, you must add this code to all of your Leadpages pages, even if you use the Wordpress plugin. This code does not transfer from your site to any “external” pages like Leadpages, ClickFunnels, or any other page creators.
Click here for instructions for Leadpages pages.
How to Place the Facebook Pixel on Your Wordpress Site
- Go into the Plugins section of your Wordpress site and download and install a plugin called Insert Headers and Footers.
- Then under Settings, click on Insert Headers and Footers.
- Copy that code again, either from the Ads Manager or from the doc that you saved on your computer, and paste it into the Scripts in Headers box.
- Click Save.
That’s it! Your Facebook pixel is installed. You do NOT need to install any event codes, unless you have hundreds of products for sale on your site.
To test it, install the free Chrome Pixel Helper extension and then visit your site.
(From now on, you’ll be able to see whether this pixel has been installed on any site. Makes me feel like MacGyver!)
How to Set Up Custom Conversions
Now that the pixel is in place, you want to make sure it can report info about people taking actions on your Facebook ads. The new way (as of late 2015) is with custom conversions).
Custom conversions are RIDICULOUSLY easy to set up:
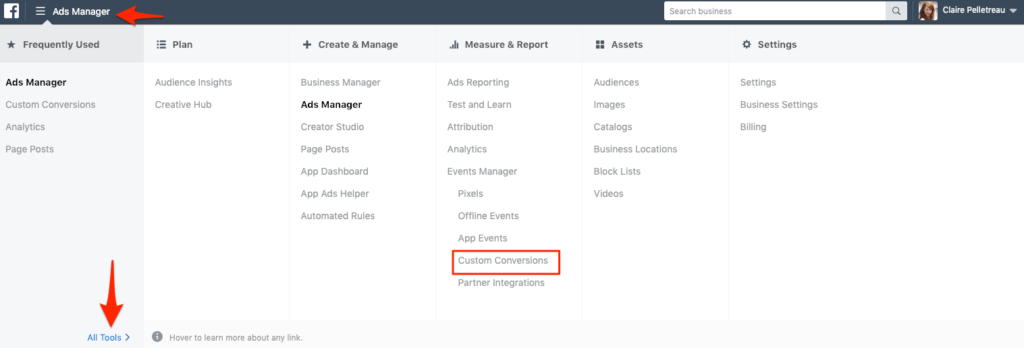
1. Go back to the Ads Manager and click on the menu at the top left. Hover over All Tools and then select Custom Conversions.
2. Click on the blue Create Custom Conversion button.
3. Insert the url of the page on your site that “marks the conversion.” Usually that means a “thank you” page that people see after signing up for your free content or buying your product.
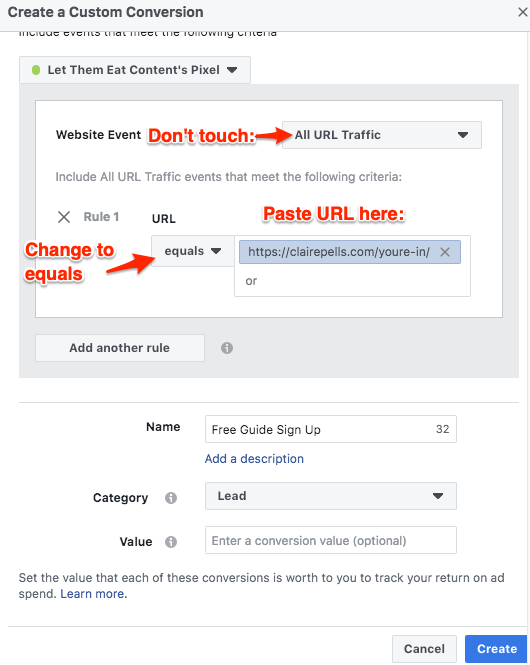
Skip the conversion value (unless you’re tracking purchases, in which case you should put the price of your product).
5. Click the Create button, and relax because you are DONE!
How to Connect Your Custom Conversion to Your Facebook Ads
This is one thing I love about this way to track conversions for your Facebook ads: it’s automatic! You don’t need to “connect” them like you did in the past.
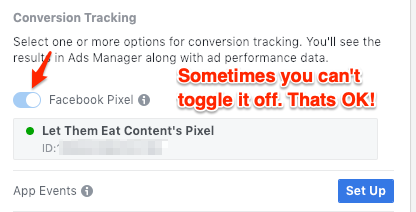
Any and all custom conversions you’ve created will be tracked on every campaign you run so long as you see this option toggled on when creating your ads:
And that, my friend, is it. Let’s recap real quick:
- Create your Facebook Pixel in the Ads Manager one time only.
- Install it on your Wordpress site one time only.
- Create custom conversions whenever you have a new thing that people can sign up for (like a cheatsheet, webinar, interest list, etc.) or product.
Why You MIGHT Want to Get Creative With Your Custom Conversions
Note: you do NOT need to do any of the following, but if you’re reeeeeeally into tracking stuff or you’re serving a client who likes lots of information about their campaigns, read on!
You can also create custom conversions for some more nuanced actions people take while visiting your website. One example is visiting an important page, like a sales page for your product or service. If you have an ecommerce store, another good conversion is adding a product to their cart.
So if you want to go deeper with your tracking, create a custom conversion with the category “View Content.”
Then you could run ads to a blog post of yours that ends with a pitch for your product. When looking at your reports, you could see:
- How many people clicked over to the blog post;
- How many of THOSE people clicked from the blog post to your sales page;
- How many people ended up buying your product as a result of your Facebook ads.
Adding more custom conversions allows you to see the different steps of your funnel, and to find out how many people are making it from one step to the next.
Getting More Advanced With Standard Events
In 2018, tons of my students and a few of my clients were met with a nasty surprise – suddenly their custom conversion tracking simply stopped working. ????
That forced me to start using Standard Events, which is another way to track your conversions. Many people still aren’t using standard events, but I highly recommend you take the extra time to learn about them and get them set up.
Best way to do that? Watch the video below for a Standard Events overview – jump to minute 01:45 to skip over the intro:
Wow, you must love detailed blog posts if you’re all the way down here. Does all that make sense? Let me know what your Facebook Pixel or Custom Conversions questions are in the comments below!
Quick question before you go: are you 100% clear on what ad strategy to use to actually make more sales in your business?
Yes, running ads can help you grow your audience and make more sales, but only if you go into it with a clear understanding of why you’re promoting each thing, and where it fits in the bigger marketing picture.
Discover the specific Facebook and Instagram ads I use every month for my 7 and 8 figure clients in this free masterclass: clairepells.com/5ads


Thank you so much for this info that helped me a lot! What if I want to track people who send me email from different pages? I have offers for active holidays and every offer has unique page and contact form for booking(want to talk personally to each customer that’s why i don’t have option add to cart ) but in the end they are redirected to same page “thank you for contact me” Can I set up somehow that I can see from which page I got Email?
Hi Matija! The only solution there is to create individual “thank you” pages for each contact form. Then each TY page would have its own custom conversion. Hope that helps!
Hi Claire, looks like something has changed – it isn’t as simple as copy/pasting the pixel code into the header. Now there are events? This is officially over my head, I would love an updated guide!
Hi Samantha! Ignore what they say about Events. Copy/paste the code, and then set up custom conversions. You’ll be fine, I promise!
Hi Claire, Thanks for your great work! I chose “view content” instead of “lead” in my custom conversions. Does this make any difference? Does “view content” refer directly to the visitor watching a video? Or can it just mean that they looked at the page?
Hey Mick, if there’s a way to set up a custom conversion to track people viewing a video on a page, I don’t know about it yet. Right now your “view content” cc is tracking everyone who lands on whatever URL you designated. Does that make sense?
Makes perfect sense. Thanks for getting back to me Claire. Best wishes from Germany via Australia.
RESOLVED—-NEVER MIND! I’m so happy I found your site! Thank so much for this helpful info. I have a question: When I attempt to set up a custom conversion I get this message: “Your Custom Conversion Isn’t Active. We haven’t received activity from this custom conversion yet. Please select an active custom conversion or create a new one.”
I wouldn’t expect to have any activity yet because I’m just setting this all up today ( a new thank oyu page and optin that I plan to send FB ads to) What am I misunderstanding? Thanks again!
PS) I have had the pixel on my site for several months and I know it works.
Great, glad that got sorted out!
Hello Claire,
I have a question. I hope you can help me :-)
I installed ‘insert headers and footers’ as a plugin in wordpress. I activated it, but there is no ‘settings’ option to click on? Where do I copy the FB pixel code?
Thank you
Solved it by using another plugin.
Do I install the same Pixel on two different websites? One is my blog and the other one is my membership account, which is related to the blog.
Use the same pixel for everything, and when creating custom conversions AND audiences from website traffic, make sure you use the whole domain. Like: clairepells.com/example-product and not just /example-product. It’ll keep things from getting confused down the line! (But don’t use the http or www stuff.)
Thanks so much!!
Suuuuuuper helpful. Thank you for the step-by-step breakdown!
You’re so welcome, Sean!
Thanks for share.
If anyone need to add fb pixel code and if you can’t add it yourself. So please contact me. I will help you to adding this. I will add it on your site only for $5 on Fiverr.com. Here my link “https://www.fiverr.com/shmilon/install-facebook-pixel-code-on-your-wordpress-site”
Thanks
Thanks for share this.
If anyone need to add fb pixel code and if you
can’t add it yourself. So please contact me. I will help you to adding
this. I will add it on your site only for $5 on Fiverr.com. Here my link
“https://www.fiverr.com/shmilon/install-facebook-pixel-code-on-your-wordpress-site”
Thanks
This is superhelpful. Thanks for great Fb pixel tutorial
very well explained, this is really helpful, thanks for writing ………!!
If any one need to add Facebook pixel code in your site so you can hire me. I will do it very fast and perfectly. Hire me at fiverr. It’s very easy to hire.
https://www.fiverr.com/shmilon/install-facebook-pixel-code-on-your-wordpress-site
amazing article, Thank you team.
Hey,
That’s really an informative tutorial on Facebook Ads Pixel. I had just one query if you could please help me out.
I want to target visitors who visit specific page on my website. I have installed the base code in the header of my website.
Do I need to insert the event code on the specific page that I want to target?
Cheers,
Nik
Yes, you need to install specific code on the pages that you want to track conversions on with specific events (AddToCart, Purchase, ViewContent, etc.). The base Pixel code only tracks visitors who view the pages of your website (PageView). With the above plugin you are doing just that, installing the base Pixel site wide.
Hi Nikhil, you would be best to create a custom audience to target people who land on a specific page on your website. You just need to have the FB pixel installed as normal (site-wide) and then choose the specific pages when you create the custom audience. Hopefully this article helps you set that up: https://clairepells.com/website-custom-audiences/
You won’t need to use standard events for this particular targeting option.
Hi there, I am using WordPress hosted by Bluehost. The header and footer plugin is not listed and I don’t see where to find it.
Any ideas?
This was awesome! I came over here from a post ByRegina.TV made and this was so helpful because for the longest I didn’t understand how to get my pixel on here. Thank you!
Thank you! This sounded so intimidating but you made it simple.
Thank you very much for sharing this tutorial.
Hi, Do I need a website to to use the facebook pixel or can I add it to my URL for tracking. I tried it with my URL and it won’t fire.
Hi Dan, the FB pixel needs to be inserted into the header of your website, not into the URL so yes you definitely need to have a website in order to use the FB pixel. I’m not sure why you would have a URL without a website though…
I didn’t set up a website because I was told I just needed a domain address to sell certain items on facebook. I will be promoting different items so nothing I can really put on a website.
Oh ok, so you won’t be able to take advantage of gathering the information the FB pixel could provide in this case. If you wanted to be able to target people who clicked through to your url you would need to set up a simple 1-page website and put the FB pixel code on the header of that. Otherwise there are other custom audience options you can use like ‘Engaged with FB Page’ or ‘Engaged with FB Posts’ etc. Hope this helps!
Thank you so much Emma.
Hi Claire,
Great guide here. I really don’t work very much with facebook and I tend to forget how from time to time. So I will keep your guide in my FireFox Pocket and use it for future ref. Thx
Hey, I just got my Pixel and have installed it in my website. no luck getting it visible. I tried “insert headers and footers” ‘Pixelyoursite” and “Pixel Caffiene” checking with “Pixel helper”
any ideas?
https://uploads.disquscdn.com/images/3b72455c70c64fac316ac15c3fe52d88d6bdd16356da44a6c8f4fcc0be390b97.png
Hi Claire,
on this page, the FB Pixel Helper on Chrome is reporting an error. What is this ?
Dear thank you very much for sharing this tutorial.